
The control starts up in Incremental jog mode. In order to jog the axes in continuous movement, you need to press the INCR/CONT key to switch from incremental to continuous jog mode.
The Machine Home position is fully X+ (turret up) and Z+ (carriage right).
|
The control starts up in Incremental jog mode. In order to jog the axes in continuous movement, you need to press the INCR/CONT key to switch from incremental to continuous jog mode. |
Turret positions are numbered 1 through 12. Tool offsets are numbered 1 through 99.
Any offset number can be used with any turret position. However, for simplicity
you will probably want to use offsets 1 through 12 with positions 1 through 12.
Turret Controls
|
When no program cycle is active, you can index to the turret backward and forward using the Aux3 and Aux6 keys on the operator panel. Press the key once to index to the next position. Press and hold the key to index multiple positions. |
|
In a program cycle, turret indexing is automatic, based on the first two digits of the four-digit tool number.
In manual and setup operations, you can also index the turret automatically
by using the ATC function key (F7 on the Setup menu, or F3 on the Tool Offset
screen); or by entering a tool-change command at the MDI prompt (F3 on the
main menu).
Hydraulic Chuck
In manual operation, use the foot switch to open and close the auto chuck.
In automatic operation (e.g. with a bar puller) use the M11 and M10 codes to open and close the chuck:
| M11 | Open Chuck |
| M10 | Close Chuck |
When the spindle is stopped and no program cycle is running, you can jog the tailstock body left and right using the Aux11 and Aux12 keys on the operator panel. Aux11 and Aux12 are the blank gray keys below Aux8 and Aux9.
The tailstock body has a hydraulic clamp, which will automatically unclamp when you use the jog keys; and will automatically reclamp a few seconds after you cease using the jog keys.
Caution: the left-end tailstock limit switch, which would ordinarily prevent you from jogging the tailstock too far toward the chuck, is inoperative. Take care to stop the tailstock before it reaches the end of its rack and ways.
When the spindle is stopped and no program cycle is running, you can
extend and retract the tailstock quill using the Aux8 and Aux9 keys on
the operator panel.
Jog Panel Summary
In normal operation, the Auxiliary keys on the jog panel have the following functions:
 |
Shift to High Gear |  |
Work Light On/Off |  |
Turret Index Reverse |
 |
Shift to Low Gear |  |
No function |  |
Turret Index Forward |
 |
Shift to Neutral |  |
Extend Tailstock Quill |  |
Retract Tailstock Quill |
| (Aux10) | No function | (Aux11) | Jog Tailstock Body Left | (Aux12) | Jog Tailstock Body Right |
| (Aux13) | No function | (Aux14) | Maintenance Mode On/Off |
| M0 | Stop (wait for Cycle Start) |
| M1 | Optional Stop (wait for Cycle Start) |
| M2 | Program Restart (with wait for Cycle Start) |
| M3 | Spindle CW / Forward |
| M4 | Spindle CCW / Reverse |
| M5 | Spindle Stop |
| M8 | Flood Coolant |
| M9 | Coolant Off |
| M10 | Close Auto Chuck |
| M11 | Open Auto Chuck |
| M40 | Shift Headstock to Neutral |
| M41 | Shift Headstock to Low Gear |
| M42 | Shift Headstock to High Gear |
M functions M91 and above are used internally in custom macro programs, but are generally not used directly in user machining programs.
See Chapter 11 of the Centroid T-Series Operator's Manual for descriptions
of the higher-numbered M functions.
Machine Parameters Summary
The following parameters on the Centroid Machine Parameters table are used for features specific to this machine.
| Parameter | Meaning | Value | Notes |
|---|---|---|---|
| P6 | ATC installed | 1 | Enable automatic tool changing |
| P161 | ATC tools | 12 | Number of turret stations |
| P57 | Load meter display | 35 | Show meters for axes 1&2 plus spindle |
| P754 | Turret slow time (ms) | 800 | Time after seeing target position, before locking the turret down |
| P761 | Spindle motor RPM for gear-shift assist | 15 | Speed of spindle motor movement to help gears mesh during shift |
| P990 | Spindle load meter scale (Volts) | 10.0 | Analog volts from ABB spindle drive, for full-scale motor load |
| P991 - P992 | Servo load meters scale (Volts) | -2.5 | Analog volts from Yaskawa servo drives, for full-scale motor load |
For all other Machine Parameter functions, see Chapter 12 of the
Centroid T-Series Operator's Manual.
Machine and Control Maintenance
Check the oil level in the main hydraulic tank periodically, and verify normal pressure readings when the pump is running.
This machine has no oil-level or pressure switches which would allow the CNC control to monitor the hydraulic system, so it is important for the machine operator to verify appropriate level and pressure.
Check the oil level in the headstock lube tank, located in back of the machine near the middle, periodically. Verify that oil is visible in the sight glass on the front of the headstock whenever the pump is running.
This machine has no oil-level or pressure switches which would allow the CNC control to monitor the headstock lube system, so it is important for the machine operator to verify appropriate level and flow.
Check the level in the way lube tank on the back of headstock end of the machine periodically.
This machine has no oil-level or pressure switches which would allow the CNC control to monitor the way lube system, so it is important for the machine operator to verify appropriate level.
Once per week, check the fan filters, and clean and replace them as needed.
Also verify that the fans themselves are running whenever Emergency Stop
is released.
In rare cases it may be necessary to operate machine components manually, bypassing the usual PLC logic and interlocks. You can do this with the Aux keys on the jog panel, but only in "Maintenance Mode". To activate Maintenance Mode, press and hold the Aux14 key on the jog panel for one second. The light in the Aux key will come on, indicating that Maintenance Mode is active. To cancel Maintenance Mode, press the Aux14 key and hold for one second again.
Aux14 is the rightmost blank blue key to the right of the Coolant control keys.

You must cancel Maintenance Mode before you can run normal program cycles.
There are no safety interlocks in Maintenance Mode. You must be careful, among other things, to:
In Maintenance Mode, the following Auxiliary keys on the jog panel have special functions:
|
Shifter Solenoid B On/Off | |
Switch to Turret Fast Rotation Solenoid | |
Turret Reverse Solenoid Momentary On |
|
Shifter Solenoid C Momentary On | |
Switch to Turret Slow Rotation Solenoid | |
Turret Reverse Solenoid Momentary On |
|
Shifter Solenoid D Momentary On | |
Turret Unclamp Solenoid On/Off | |
Turret Clamp Solenoid On |
| (Aux10) | Tailstock Body Unclamp/Clamp | (Aux11) | Tailstock Body Left | (Aux12) | Tailstock Body Right |
| (Aux13) | No function | (Aux14) | Maintenance Mode On/Off |
The PLC program can generate the following messages, in addition to those listed in the Centroid operator's manual.
You can use the PLC Diagnostic display on the console to view some of the Centroid PLC input and memory locations mentioned with these error and fault conditions. At the control's main screen, press Alt-I to activate the PLC Diagnostic display. Press Alt-I again to dismiss it.
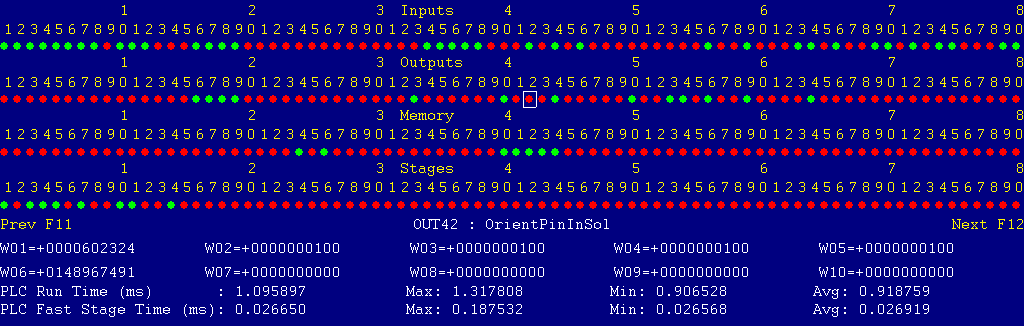
Each page of the Diagnostic display shows four rows of red and green dots: the first row shows PLC inputs 1 through 80; the second row PLC outputs 1 through 80; the third row PLC memory bits 1 through 80; and the fourth row PLC program stages 1 through 80.
You can use the arrow keys to move a highlight box over any of these locations. The name of the highlighted location will be displayed in the center of the screen below the red and green dots.
For example, in the illustration above the highlight box is on Output #42: The dot below the 2, to the right of the superscript 4, on the second line. Its name is displayed as "OUT42 : OrientPinInSol".
Below the four rows of bit status information are ten numeric ("word") variable values, labeled W1 through W10. Some of these variables also hold useful status information, described with the error and fault conditions to follow.
There are multiple pages of Diagnostic data. With the Alt-I diagnostic display showing, you can use the F12 and F11 keys to scroll right and left. For example, pressing F12 once will shift to the page showing inputs and outputs 81 through 160, and word variables W11 through W20.
Messages with 9000-series message numbers are Faults. After resolving the problem, you must press and release the Emergency Stop button to clear a Fault.
Messages with 8000-series message numbers are Errors. Errors will cancel the program cycle and stop the spindle and coolant, but they do not then need to be explicitly reset.
Messages with 5000-series and 2000-series message numbers are Warnings
and Informational Messages. They do not cancel the cycle or require
any action to reset.
Opening the Control Cabinet Doors
In some cases, it may be necessary to open the control cabinet or power cabinet doors while power is on. For example, servo drive and spindle drive fault conditions can be more readily identified using the codes displayed on, or stored in, the drive units themselves.
WARNING: Use appropriate caution when working in the control cabinets
while power is on. Lethal voltages, up to 480VAC, are
present on many components.
The control detected an internal error in processing the PLC logic program.
Report this error to your dealer, along with the values from W14 and W15. Also report what function the machine was performing when the fault occurred.
You must shut down and cycle the power to clear this fault.
References:
PLC W14: Copy of internal SV_PLC_FAULT_STATUS, indicating the type of problem
PLC W15: Copy of internal SV_PLC_FAULT_ADDRESS, indicating the location of the problem
The Oak control unit detected an internal communication failure with its PLC section.
Check for possible sources of electronic interference, especially of voltage spikes from inductive devices (solenoids and motors).
Press and release Emergency Stop to clear the fault.
The Oak control unit detected an internal communication failure with its PLC section.
Check for possible sources of electronic interference, especially of voltage spikes from inductive devices (solenoids and motors).
Press and release Emergency Stop to clear the fault.
The ABB spindle drive unit is reporting a fault condition.
If possible, check the LED display on the spindle drive itself for a fault code.
Press and release Emergency Stop to reset the drive and clear the fault.
References:
PLC INP10: indicates spindle drive status.  Green = closed = okay, Red = open = fault
Schematic: Lines 7, 101
The control unit detected loss of communication from the operator panel in the console.
Check for damage or disturbance to the cable between the operator panel and the Oak unit in the control cabinet.
Press and release Emergency Stop to clear the fault.
References:
Schematic: Lines 80, 89
The operator panel in the console reported back to the control unit a loss of communication from the control unit. This indicates the return signal from the panel is functioning normally, but the outgoing signal may have problems.
Check for damage or disturbance to the cable between the operator panel and the Oak unit in the control cabinet.
Press and release Emergency Stop to clear the fault.
References:
Schematic: Lines 80, 89
You exited the CNCT control software without first pressing Emergency Stop.
Always press Emergency Stop prior to exiting the control software.
Press and release Emergency Stop to clear the fault.
The main hydraulic pump has tripped the overload on its starter MS-2.
Investigate possible causes for excessive pump motor load.
Allow time for the overload unit to cool down, then press the reset button on the overload unit. Press and release Emergency Stop to clear the fault.
References:
PLC INP14: indicates whether MS-2 is closed.  Green = closed = okay, Red = open = off
Schematic: Lines 15, 34, 103
The flood coolant pump has tripped the overload on its starter MS-3.
Investigate possible causes for excessive pump motor load.
Allow time for the overload unit to cool down, then press the reset button on the overload unit. Press and release Emergency Stop to clear the fault.
References:
PLC INP15: indicates whether MS-3 is closed.  Green = closed = okay, Red = open = off
Schematic: Lines 17, 104, 147
The spindle motor fan; headstock lube pump; or way lube pump has tripped its respective overload (OL5, OL6 or OL7) so that starter MS-6 fails to close.
Investigate possible causes for excessive load.
Allow time for the overload unit to cool down, then press the reset button on the affected overload unit. Press and release Emergency Stop to clear the fault.
References:
PLC INP16: indicates whether MS-6 is closed.  Green = closed = okay, Red = open = off
Schematic: Lines 19-23, 35, 104
The control lost communication with the PLC I/O expansion board.
Power down, open the cabinet, and check the connections at both ends of the gray cable which connects H8 on the Oak unit to H3 on the PLCADD1616 board.
References:
PLC W36: bitmap of detected PLC expansion boards.  1 = one board detected
Machine Parameter 900: bitmap of expected PLC expansion boards.  1 = one board expected
Schematic: Lines 82, 107
The turret-position sensors, LS6 - LS11, showed a pattern that does not correspond to any of the valid tool turret positions.
If for some reason the turret was stopped between positions, then this might be normal. Use Maintenance Mode to unlock the turret, advance it to a valid stopping point, and lock it back down.
If this fault occurs while the turret is in one of its valid tool positions, then this probably indicates a failure of one or more of the turret-position sensors, or the wiring from them.
Use the Alt-i PLC Diagnostic display to check the status of the turret-position sensors. Compare that with the actual turret position, and with the table on Page 2 of the wiring schematic, to see which sensor or sensors are incorrect.
Note that this machine has non-standard turret-position sensors, which are normally closed. Therefore an open input (0 bit) indicates an active sensor, and a closed input (1 bit) indicates an inactive sensor.
References:
PLC INP18: indicates turret sensor A state.  Green = inactive, Red = open = active
PLC INP19: indicates turret sensor B state.  Green = inactive, Red = open = active
PLC INP20: indicates turret sensor C state.  Green = inactive, Red = open = active
PLC INP21: indicates turret sensor D state.  Green = inactive, Red = open = active
PLC INP22: indicates turret sensor E state.  Green = inactive, Red = open = active
PLC INP23: indicates turret sensor F state.  Green = inactive, Red = open = active
PLC W33: turret sensors interpreted as a binary number from 0 to 63
Schematic: Lines 106-111
With no turret index in progress, the turret-position sensors indicated a position different from the one the turret is supposed to be at.
This probably indicates a failure of one or more of the turret-position sensors, or the wiring from them.
It could also indicate that a turret index operation somehow ended with the turret in the wrong position, perhaps due to a failure in the stop-and-lock sequence.
Use the Alt-i PLC Diagnostic display to check the status of the turret-position sensors. Compare that with the actual turret position, and with the table on Page 2 of the wiring schematic, to see which sensor or sensors are incorrect.
Note that this machine has non-standard turret-position sensors, which are normally closed. Therefore an open input (0 bit) indicates an active sensor, and a closed input (1 bit) indicates an inactive sensor.
References:
PLC INP18: indicates turret sensor A state.  Green = inactive, Red = open = active
PLC INP19: indicates turret sensor B state.  Green = inactive, Red = open = active
PLC INP20: indicates turret sensor C state.  Green = inactive, Red = open = active
PLC INP21: indicates turret sensor D state.  Green = inactive, Red = open = active
PLC INP22: indicates turret sensor E state.  Green = inactive, Red = open = active
PLC INP23: indicates turret sensor F state.  Green = inactive, Red = open = active
PLC W33: turret position indicated by the sensors (1 - 12)
Schematic: Lines 106-111
During an automatic program cycle, with no tool change in progress, the turret was not locked down.
If the turret is unlocked due to a previous tool-change failure, use the Aux3 or Aux6 manual turret index key to index the turret until it locks down properly.
References:
PLC INP24: indicates LS12 state.  Green = closed = turret not locked, Red = open = turret locked
Schematic: Line 112
You attempted to start an automatic program cycle, but Maintenance Mode is still active.
Press and hold the Aux14 key for one second, until the Aux14 LED goes out.
The part program requested a turret position other than T1 through T12.
Check the Tool Library in Intercon to verify that the Tool Location for each tool in your program is set to a valid turret position.
Note that to cancel tool offsets at the end of a CNC G code program, you must repeat the active turret position, changing only the offset portion to zero. For example "T0113" to "T0100" or "T0404" to "T0400". Programming "T0" (or "T0000") will result in an invalid tool number error.
During an automatic tool change the control powered the unlock solenoid, then waited for the turret to unlock prior to rotation, but the turret-locked sensor did not change within one second to indicate the turret was successfully unlocked.
This could be due to a hydraulic failure, a mechanical jam, or failure to get power to the unlock solenoid.
References:
PLC INP24: indicates LS12 state.  Green = closed = turret not locked, Red = open = turret locked
PLC OUT17: indicates clamp solenoid power.  Green = On = clamp, Red = Off = unclamp
PLC OUT18: indicates unclamp solenoid power.  Green = On = unclamp, Red = Off = clamp
Schematic: Lines 112, 169-170
During an automatic tool change, the turret failed to arrive at the target position within twelve seconds.
If the turret did not rotate at all, then the problem could be a hydraulic failure, a mechanical jam, or failure to get power to the rotation solenoids.
If the turret rotated continuously for twelve seconds (going more than one full turn in the process) then the problem could be a faulty turret position sensor. Check the turret sensor inputs and compare with the truth table on the schematic diagram.
Note that this machine has non-standard turret-position sensors, which are normally closed. Therefore an open input (0 bit) indicates an active sensor, and a closed input (1 bit) indicates an inactive sensor.
References:
PLC OUT23: indicates forward rotation solenoid power.  Green = On = rotate turret, Red = Off
PLC OUT25: indicates reverse rotation solenoid power.  Green = On = rotate turret, Red = Off
PLC OUT24: indicates fast rotation solenoid power.  Green = On = fast speed, Red = slow speed
PLC OUT26: indicates slow rotation solenoid power.  Green = On = slow speed, Red = fast speed
PLC INP18: indicates turret sensor A state.  Green = inactive, Red = open = active
PLC INP19: indicates turret sensor B state.  Green = inactive, Red = open = active
PLC INP20: indicates turret sensor C state.  Green = inactive, Red = open = active
PLC INP21: indicates turret sensor D state.  Green = inactive, Red = open = active
PLC INP22: indicates turret sensor E state.  Green = inactive, Red = open = active
PLC INP23: indicates turret sensor F state.  Green = inactive, Red = open = active
PLC W26: decoded turret position (1-12)
Schematic: Lines 106-111, 175-178
During an automatic tool change, at the point of moving slowly from the position preceding the target, to the final target position, the turret-position sensors did not indicate arrival at the final target position within four seconds.
This could be because turret rotation stopped (e.g. due to a hydraulic failure or mechanical problem), or because of a failure of the turret-position sensors.
References:
PLC OUT23: indicates forward rotation solenoid power.  Green = On = rotate turret, Red = Off
PLC OUT25: indicates reverse rotation solenoid power.  Green = On = rotate turret, Red = Off
PLC OUT24: indicates fast rotation solenoid power.  Green = On = fast speed, Red = slow speed
PLC OUT26: indicates slow rotation solenoid power.  Green = On = slow speed, Red = fast speed
PLC INP18: indicates turret sensor A state.  Green = inactive, Red = open = active
PLC INP19: indicates turret sensor B state.  Green = inactive, Red = open = active
PLC INP20: indicates turret sensor C state.  Green = inactive, Red = open = active
PLC INP21: indicates turret sensor D state.  Green = inactive, Red = open = active
PLC INP22: indicates turret sensor E state.  Green = inactive, Red = open = active
PLC INP23: indicates turret sensor F state.  Green = inactive, Red = open = active
PLC W26: decoded turret position (1-12)
Schematic: Lines 106-111, 175-178
During an automatic tool change the control attempted to lock the turret back down after rotation, but the turret-locked sensor did not change within four seconds to indicate the turret was successfully locked.
This could be due to a hydraulic failure, a mechanical jam, mechanical misalignment, or a too-short timer value in Machine Parameter 754.
References:
PLC INP24: indicates LS12 state.  Green = closed = turret not locked, Red = open = turret locked
PLC OUT17: indicates clamp solenoid power.  Green = On = clamp, Red = Off = unclamp
PLC OUT18: indicates unclamp solenoid power.  Green = On = unclamp, Red = Off = clamp
Schematic: Lines 112, 169-170
The CNC program, in combination with the current Spindle Speed Override setting, has requested a spindle RPM lower than the minimum allowed RPM set in the Control Configuration.
No action is required, but be aware that the spindle will be running at the minimum allowed RPM, and therefore will be running faster than the requested or programmed speed.
The PLC program requested display of a message on the screen, but the provided message code was not valid.
This indicates an error in the PLC program. Report the message to your dealer, along with the value in PLC variable W16.
References:
PLC W16: stores the invalid message code
The PLC hardware detected the presence of an I/O expansion board, but the setting of Machine Parameter 900 did not tell it to expect that board in the system.
On this machine, there should be one I/O expansion board installed, and Machine Parameter 900 should be set to 1.0.
References:
PLC W36: bitmap of detected PLC expansion boards.  1 = one board detected
Machine Parameter 900: bitmap of expected PLC expansion boards.  1 = one board expected
Schematic: Lines 82, 107
The program attemped to run an M3 or M4 spindle-start code, but the control is still in Manual Spindle mode.
Press the SPIN AUTO/MAN key in the top row of the operator panel to select Auto Spindle mode (LED on); then press CYCLE START to resume program operation.
The program attempted to run an M7 or M8 coolant-on code, but the control is still in Manual Coolant mode.
Press the Coolant AUTO/MAN key at the left side of the coolant controls row of the operator panel to select Auto Coolant mode (LED on); then press CYCLE START to resume program operation.
If you want to run the program cycle without coolant, you can press CYCLE START to resume operation without restoring Auto Coolant mode.
A previous servo drive fault condition has been resolved, and cleared with Emergency Stop.
A previous PLC fault condition has been resolved, and cleared with Emergency Stop.
You inadvertently pressed a keyboard combination that is used for keyboard jogging controls, but keyboard jogging features have been disabled on this machine.
A previous fault condition has been cleared with Emergency Stop.
The order of the axis drives; order of the axis definitions in the control configuration menus; and order of the axis jogging controls can vary. Definitions for this machine are as follows:
| Axis | Axis # | Drive # | Drive-Okay Bit | Jog Keys | MPG Position |
|---|---|---|---|---|---|
| Z | 1 | 1 | MEM16 | Z | 1 (Z) |
| X | 2 | 2 | MEM17 | X | 2 (X) |
28-Jan-2022 MBL
![]()